28 dic 2011

Network Setting Manager

In OSX Network Positions are very useful. Unfortunately in Windows is not possibile.

Network Setting Manager is able to add this feature.

Are you tired of changing your network configuration on your
laptop or computer every day? Always the same procedure?

On the go: changing...
At home: changing...
In the office: changing...

Then NetSetMan is your solution. It will do the work for you.
Switch between network profiles for different locations instantly!

http://www.netsetman.com/index.php?s=nsm

Thanks to S_Net for reporting

Windows Server Core, Hyper-V core: How to turn off NIC DNS register

netsh interface ipv4 set dnsserver name="Local Area Connection" source=static address="10.10.10.1" register=none

Windows Server Core, Hyper-V Core: Modifying network bindings from the command line.

nvspbind is a tool for modifying network bindings from the command line. It is especially useful in Server Core environments with the Hyper-V role enabled.

It can be used to set the correct bindings for NICs used in Virtual Networks.
It can also be used to enable or disable specific bindings on any NIC and to query and change the NIC connection order.
It utilizes the INetCfg APIs documented on MSDN (http://msdn.microsoft.com/en-us/library/ms805265.aspx).

Most options are documented in the readme and nvpsbind.txt which download with the install.

To get help run “nvspbind.exe /?”

C:\>nvspbind /?
Hyper-V Network VSP Bind Application 6.1.7690.0.
Copyright (c) Microsoft Corporation. All rights reserved.
Usage: nvspbind option NIC protocol
Options:
/n display NIC information only
/u unbind switch protocol from specified nic(s)
/b bind switch protocol to specified nic(s)
/d disable binding of specified protocol from specified nic(s)
/e enable binding of specified protocol to specified nic(s)
/r repair bindings on specified nic(s)
/o show NIC order for specified protocol
/+ move specified NIC up in binding order for specified protocol
/- move specified NIC down in binding order for specified protocol
/++ move specified NIC up to top of binding order for specified protocol
/-- move specified NIC down to bottom of binding order for specified protocol

http://archive.msdn.microsoft.com/nvspbind

Hyper-V Cluster: Network Configuration

Management Network(Parent Partition)
1 Network Card

  • Make sure this card is listed first in the Adapter and Bindings connection order.
  • In Failover Cluster Manager make sure that the NIC is configured to allow cluster network communication on this network. This will act as a secondary connection for the Heartbeat.

Storage ISCSI
2 Network Cards – Not Teamed

  • Enable MPIO.
  • Disable NetBIOS on these interfaces
  • Do not configure a Gateway
  • Do not configure a DNS server
  • Make sure that each NIC is NOT set to register its connection in DNS
  • Remove File and Printer sharing
  • Do not remove Client from Microsoft networks if using Netapp Snapdrive with RPC authentication
  • In Failover Cluster Manager select- Do not allow cluster network communication on this network

VM Network
(Parent Partition)
2 Network cards :
1 for Dynamic IP’s
1 for Reserved IP’s

  • Disable NetBIOS on these interfaces
  • Do not configure a Gateway
  • Do not configure a DNS server
  • Make sure that each NIC is NOT set to register its connection in DNS
  • Remove File and Printer sharing and Client from Microsoft networks
  • In Failover Cluster Manager select – Do not allow cluster network communication on this network.

Cluster Heartbeat
1 Network Card

  • Disable NetBIOS on this interface
  • Do not configure a Gateway
  • Do not configure a DNS server
  • Make sure that this NIC is NOT set to register its connection in DNS
  • Make sure that Client for Microsoft Networks and File and Printer Sharing for Microsoft Networks are enabled to support Server Message Block (SMB), which is required for CSV.
  • In Failover Cluster Manager make sure that the NIC is configured to allow cluster network communication on this network.
  • In Failover Cluster Manager remove the tick box for Allow Clients Connect through this network. This setting has nothing to do with the host/parent partition. This setting is used to control over what NICs the Cluster Resources can be accessed.

Cluster Shared Volume (CSV)
1 Network Card

  • Disable NetBIOS on this interface
  • Make sure that this NIC is NOT set to register its connection in DNS
  • Make sure that Client for Microsoft Networks and File and Printer Sharing for Microsoft Networks are enabled to support Server Message Block (SMB), which is required for CSV.
  • In Failover Cluster Manager remove the tick box for Allow Clients Connect through this network. This setting has nothing to do with the host/parent partition. This setting is used to control over what NICs the Cluster Resources can be accessed. This is more relevant for other workloads e.g. File Cluster. It has no impact on the communication with the host partition or for the VM’s themselves.
  • By default the cluster will automatically choose the NIC to be used for CSV communication. We will change this later.
  • This traffic is not routable and has to be on the same subnet for all nodes.

Live Migration
1 Network Card

  • Disable NetBIOS on this interface
  • Make sure that this NIC is NOT set to register its connection in DNS.
  • In Failover Cluster Manager remove the tick box for Allow Clients Connect through this network. This setting has nothing to do with the host/parent partition. This setting is used to control over what NICs the Cluster Resources can be accessed. This is more relevant for other workloads e.g. File Cluster. It has no impact on the communication with the host partition or for the VM’s themselves.
  • By default the cluster will automatically choose the NIC to be used for Live-Migration. You can select multiple networks for LM and give them a preference.

22 dic 2011

How to enable Jumbo Frames on Hyper-V Server

Attention: I reported the following "good" article only for redundancy. The original source is here: http://mrshannon.wordpress.com/2010/01/13/jumbo-frames-on-hyper-v-server/

Enabling Jumbo Frame support in Hyper-V Server 2008 R2 (or Windows Server Core) has proven to be a bit of an adventure. It really just involves setting the MTU size, but it has to be done in the OS (to affect the TCP/IP stack) as well as the network cards’ driver. Since Core versions of Windows do not have a network control, setting the MTU on the cards proves to be a bit of a trick. This is what I had to do to enable Jumbo Frames on several iSCSI nics, and since it differs for Intel vs Broadcom adapters, there are two procedures.

I should point out that this does not address configuring the network switch that these nics are attached to. That is a whole ‘nother can of worms, but suffice it to say that the switch must not only support Jumbo Frames but have that support enabled, along with a whole host of other settings.

Enable Jumbo Frames on the OS

The first thing you need to do is make sure that your server will allow jumbo frames. You do this by setting the MTU on your adapters to 9000. The easiest way to do this is by running a netsh command on each adapter you want to use Jumbo Frames.

Get a list of interface names by running “netsh int show int

Admin State State Type Interface Name

-------------------------------------------------------------------------

Enabled Disconnected Dedicated Local Area Connection 2

Enabled Connected Dedicated Bcom-GB3-iSCSI-A

Enabled Connected Dedicated Local Area Connection

Enabled Connected Dedicated Local Area Connection 3

Enabled Connected Dedicated Local Area Connection 4

Enabled Connected Dedicated Bcom-GB4-iSCSI-B

Enabled Connected Dedicated Intel-GB1-Guest-B

Enabled Connected Dedicated Bcom-GB2-Guest-A

Enabled Connected Dedicated Intel-GB2-Guest-C

Enabled Connected Dedicated Bcom-GB1-Mgmnt

Enabled Connected Dedicated Intel-GB3-iSCSI-C

Enabled Connected Dedicated Intel-GB4-Migration

In this case I have already re-named the Interfaces that I intend to use for iSCSI. You might just see a whole list of “Local Area Connection” interfaces. You can use ipconfig or netsh to further identify which ones you want to use.

Now for each interface you want jumbo frames enabled, run this command:

netsh int ipv4 set subint “<Interface Name Goes Here>” mtu=9000 store=persistent

Now you have to configure Jumbo Frames in the driver for each interface.

Enable Jumbo Frames on Intel cards

The Intel driver stores it’s “Jumbo Frame” settings in the registry. Thankfully, Hyper-V Server (and Windows Core) comes with Regedit, so you can just launch that from command line (regedit.exe) and browse to the following key:

HKEY_LOCAL_MACHINE\SYSTEM\CurrentControlSet\services\Tcpip\Parameters\Interfaces

Here you will see all the network interfaces listed by GUID. I have found that the easiest way to determine which GUID is which adapter is by finding the IP address and being able to correlate it to the right Interface name.

At this point you should start making a list to help keep things straight. Copy the GUID into notepad and list the IP address next to it and do this for each card you want to configure. So for this server, my list looks like this:

SERVERNAME {7A310D71-217C-4E4A-9DA7-43299A76CBD5} 172.16.0.9

SERVERNAME {7BC7F3B9-B245-4579-82CB-C94161BFDBC1} 172.16.0.7

SERVERNAME {8BA5076E-0FC3-4D20-9609-654F228EE6BD} 172.16.0.6

SERVERNAME {98ABBECA-B8A2-41D2-9550-8B571E50F49A} 172.16.0.8

Now we have to navigate to a new registry key to configure the driver. Go here:

HKEY_LOCAL_MACHINE\SYSTEM\CurrentControlSet\Control\Class\{4D36E972-E325-11CE-BFC1-08002BE10318}

Here you will again see a list of all network interfaces, only this time they are under 4 digit identifiers. From here, search for the GUID that you copied to your list and you should find it as the “NetCfgInstanceId” key of one of the adapters. Once found, it’s not a bad idea to update your list to keep track of what’s what. Mine looks like this now:

SERVERNAME {7A310D71-217C-4E4A-9DA7-43299A76CBD5} 172.16.0.9 0009 Intel

SERVERNAME {7BC7F3B9-B245-4579-82CB-C94161BFDBC1} 172.16.0.7 0005 Broadcom

SERVERNAME {8BA5076E-0FC3-4D20-9609-654F228EE6BD} 172.16.0.6 0004 Broadcom

SERVERNAME {98ABBECA-B8A2-41D2-9550-8B571E50F49A} 172.16.0.8 0008 Intel

Scroll up to find the “*JumboPacket” key and double click it to change the default value of 1514 to 9014. Note the extra 14 bytes here represents packet headers that normally are not counted in MTU size.

Repeat this for each Intel adapter you need to configure, and then reboot the server for the setting to take effect.

Enable Jumbo Frames on Broadcom cards

First make sure you have the latest Broadcom drivers. Make sure you get the 2008 R2 x64 set.

If you haven’t already, then download and install the driver and then reboot the host. Note: Make sure you migrate any existing guest servers off the host before you install the drivers. The temporary outage of the card due to the update seems to make a failover cluster angry.

Now get the Broadcom Management Application suite. Again, get the x64 set from the same page.

Install the management app. I opt’d not to install the BASP component (see screenshot below) since we do not want failover or teaming in this scenario. It’ll likely warn you that you need the dotNet Framework 2.0 and you should be able to ignore this because the installer just does not recognize the “Core” framework, but the application still runs. To make sure you do in fact have the framework installed, run “oclist | findstr /i netfx” and look for a line stating that NetFx is installed. For example, “Installed:NetFx2-ServerCore”. If not, you can install it by running “start /w ocsetup NetFx2-ServerCore” or instead you can install dotNet 3.0 and 3.5 by running “start /w ocsetup NetFx3-ServerCore”.

From C:\Program Files\Broadcom\BACS run “BACSCLi” to run in interactive mode. It will show you a list of all network adapter drivers installed. You only care about the “NDIS” adapters so enter “list ndis” and you’ll see something like this:

C MAC Dev Type Name

- ------------ -------- ----------------------------------------------------

0 001B214285B8 NDIS [0000] Intel(R) Gigabit ET Quad Port Server Adapter

1 001B214285B9 NDIS [0007] Intel(R) Gigabit ET Quad Port Server Adapter #2

2 001B214285BC NDIS [0008] Intel(R) Gigabit ET Quad Port Server Adapter #3

3 001B214285BD NDIS [0009] Intel(R) Gigabit ET Quad Port Server Adapter #4

4 0026B9429866 NDIS [0002] Broadcom BCM5709C NetXtreme II GigE (NDIS VBDClient)

5 0026B9429868 NDIS [0003] Broadcom BCM5709C NetXtreme II GigE (NDIS VBDClient) #2

6 0026B942986A NDIS [0004] Broadcom BCM5709C NetXtreme II GigE (NDIS VBDClient) #3

7 0026B942986C NDIS [0005] Broadcom BCM5709C NetXtreme II GigE (NDIS VBDClient) #4

If you did the Intel configuration you’ll notice the four digit number in square braces of the Name field matches the Control\Class registry key.

Use some combination of “ipconfig /all” in another window or CtxAdmTools’ Visual Core Configurator 2008 or the four digit registry code to identify the adapter that you want to configure. In this example we want Connection #6. Select it by using “select 6” or whatever number is in the “C” column that matches your adapter. Now validate that you have selected the correct adapter by reviewing some of its details. Run “info” to see it’s MAC/IP, etc.

Vital Signs

-----------

MAC Address: : 00-26-B9-42-98-6A

Permanent MAC Address: : 00-26-B9-42-98-6A

IPV4 Address : 172.16.0.6

Link Status : UP

Duplex: : Full

Speed(in Mbps): : 1000

Offload Capabilities : TOE,LSO,CO,RSS

Mtu : 1500

Driver Information

-----------

Driver Status: : Loaded

Driver Name: : bxnd60a.sys

Driver Version: : 5.0.13.0

Driver Date: : 07/30/2009

Notice the MTU setting is set to 1500 by default. Now run “cfg advanced” to list its advanced properties.

Advanced

--------

Ethernet@WireSpeed: Enable (Default)

Flow Control: Disable

IPv4 Checksum Offload: Tx/Rx enabled (Default)

IPv4 Large Send Offload: Enable (Default)

IPv6 Checksum Offload: Tx/Rx enabled (Default)

IPv6 Large Send Offload: Enable (Default)

Interrupt Moderation: Enable (Default)

Jumbo MTU: 1500 (Default)

Locally Administered Address: Not Present (Default)

Number Of RSS Queues: 8 (Default)

Priority & VLAN: Priority & VLAN enabled (Default)

Receive Buffers: 750 (Default)

Receive Side Scaling: Enable (Default)

Speed & Duplex: Auto (Default)

TCP Connection Offload (IPv4): Enable (Default)

TCP Connection Offload (IPv6): Enable (Default)

Transmit Buffers: 1500 (Default)

VLAN ID: 0 (Default)

Wake Up Capabilities: Both (Default)

Run “cfg advanced “Jumbo MTU”=9000” to set Jumbo frames to 9000 bytes. Note that you do not have to account for the 14 bytes of header data here. It’ll take a few seconds to apply the change but you should not need to reboot (yay!). You can now run “cfg advanced” and “info” to list the settings and ensure that the MTU is in fact set to 9000.

You should also enable Flow Control for Transmit (Tx) and Receive (Rx). With the correct adapter already selected, run “cfg advanced “Flow Control”=”Rx & Tx enabled””.

Once that is complete you can enter “q” to exit BACScli or start over using “list ndis” and select another interface to configure. You can also use this utility to select non-Broadcom adapters to display some of their info like MTU size.

Testing Jumbo Frames

To test if Jumbo Frames are working you can ping another host target that also supports Jumbo Frames. The easiest way that I have found to do this was to just change the IP of your test NIC and your test target NIC to something that no other adapter has. This is because there is no way to tell windows specifically what NIC to send traffic over, so setting the NIC’s to their own network ip space is the only way to ensure that the ping traverses a particular adapter.

For example, I changed the source test nic to 172.16.1.4 and the target to 172.16.1.8 and no other adapters on either host saw set in the 172.16.1.* range.

First try a normal “ping 172.16.1.8” and it should work fine. Then use “ping -f -l 6000 172.16.1.8” to test jumbo frames and it should also work, only this time you’ll see it sending 6000 bytes instead of 32.

So that about covers it. I had to do this for each of the 32 iSCSI nics spread across the 8 host servers, but it works! You should be aware that if you do a driver update or if you share a NIC with a virtual network (as a Hyper-V Host) your settings may be lost and you’ll have to go through this again

20 dic 2011

Exchange Server 2010 Build Numbers and Release Dates

To view the build number for the version of Exchange 2010 that you’re running, run the following command in the Exchange Management Shell:

Get-ExchangeServer | fl name,edition,admindisplayversion

All versions here:

Exchange Server 2010

Product name

Build number

Date

KB

Microsoft Exchange Server 2010 RTM

14.0.639.21

11/9/2009


Update Rollup 1 for Exchange Server 2010

14.0.682.1

12/9/2009

KB976573 clip_image001[30]

Update Rollup 2 for Exchange Server 2010

14.0.689.0

3/4/2010

KB979611 clip_image001[31]

Update Rollup 3 for Exchange Server 2010

14.0.694.0

4/9/2010

KB981401 clip_image001[32]

Update Rollup 4 for Exchange Server 2010

14.0.702.1

6/17/2010

KB982639 clip_image001[33]

Update Rollup 5 for Exchange Server 2010

14.0.726.0

12/13/2010

KB2407113 clip_image001[34]


Exchange Server 2010 Service Pack 1

Product name

Build number

Date

KB

Microsoft Exchange Server 2010 SP1

14.1.218.15

8/24/2010


Update Rollup 1 for Exchange Server 2010 SP1

14.1.255.2

10/4/2010

KB2407028 clip_image001[35]

Update Rollup 2 for Exchange Server 2010 SP1

14.1.270.1

12/9/2010

KB2425179 clip_image001[36]


Update Rollup 3 for Exchange Server 2010 SP1

14.1.289.3

3/7/2011

KB2492690 clip_image001[37]

Update Rollup 3-v3 for Exchange Server 2010 SP1

14.1.289.7

4/1/2011

KB2529939 clip_image001[38]

Update Rollup 4 for Exchange Server 2010 SP1

14.1.323.1

6/22/2011

KB2509910 clip_image001[39]

Update Rollup 4-v2 for Exchange Server 2010 SP1

14.1.323.6

7/27/2011

KB2579150 clip_image001[40]

Update Rollup 5 for Exchange Server 2010 SP1

14.1.339.1

8/23/2011

KB2582113 clip_image001[41]

Update Rollup 6 for Exchange Server 2010 SP1

14.1.355.2

10/27/2011

KB2608646 clip_image001[42]

Exchange Server 2010 Service Pack 2

Product name

Build number

Date

KB

Microsoft Exchange Server 2010 SP2

14.2.247.5

4/12/2011


http://social.technet.microsoft.com/wiki/contents/articles/exchange-server-and-update-rollups-builds-numbers.aspx

http://technet.microsoft.com/en-us/library/hh135098.aspx

5 dic 2011

Microsoft Exchange Server 2010 Service Pack 2 (SP2)

Exchange Server 2010 Service Pack 2 (SP2) is available for download. The latest SP includes functionality that is aimed at helping users navigate and manage their cloud-on-premises hybrid environments.

The newest SP adds new protection and compliance tooling; additional deployment options; and the return of Outlook Mobile Access (OMA). SP2 also includes a new hybrid configuration wizard, which, as Softpedia explained, can help automate “the setup of a hybrid connection between Exchange Online running in Office 365 and an on-premises Exchange 2010 organization.”

Exchange 2010 SP2 is supported on Windows 7 Professional 64-bit, Windows Server 2008 R2 SP1, Windows Server 2008 R2 Standard, Windows Server 2008 Standard.

Exchange 2010 SP2 isn’t the only Microsoft offering that bridges the cloud-on-premises gap. Microsoft is in the midst of a strategy shift in terms of how it intends to encourage customers to move from private to public clouds, officials have said recently.

More info:

What's New in Exchange 2010 SP2: http://technet.microsoft.com/en-us/library/hh529924.aspx

Released: Exchange Server 2010 SP2: http://blogs.technet.com/b/exchange/archive/2011/12/05/released-exchange-server-2010-sp2.aspx

Download:

http://www.microsoft.com/download/en/details.aspx?id=28190&WT.mc_id=rss_alldownloads_all

30 nov 2011

Open the firewall port for SQL Server

Windows Firewall on Windows Server 2008 helps prevent unauthorized access to computer resources. However, if the firewall is configured incorrectly, attempts to connect to an instance of SQL Server may be blocked. To access an instance of SQL Server that is behind the firewall, you must configure the firewall on the computer that is running SQL Server.

The following script is able to resolve our issue easily:

@echo ========= SQL Server Ports ===================
@echo Enabling SQLServer default instance port 1433
netsh firewall set portopening TCP 1433 "SQLServer"
@echo Enabling Dedicated Admin Connection port 1434
netsh firewall set portopening TCP 1434 "SQL Admin Connection"
@echo Enabling conventional SQL Server Service Broker port 4022
netsh firewall set portopening TCP 4022 "SQL Service Broker"
@echo Enabling Transact-SQL Debugger/RPC port 135
netsh firewall set portopening TCP 135 "SQL Debugger/RPC"
@echo ========= Analysis Services Ports ==============
@echo Enabling SSAS Default Instance port 2383
netsh firewall set portopening TCP 2383 "Analysis Services"
@echo Enabling SQL Server Browser Service port 2382
netsh firewall set portopening TCP 2382 "SQL Browser"
@echo ========= Misc Applications ==============
@echo Enabling HTTP port 80
netsh firewall set portopening TCP 80 "HTTP"
@echo Enabling SSL port 443
netsh firewall set portopening TCP 443 "SSL"
@echo Enabling port for SQL Server Browser Service's 'Browse' Button
netsh firewall set portopening UDP 1434 "SQL Browser"
@echo Allowing multicast broadcast response on UDP (Browser Service Enumerations OK)
netsh firewall set multicastbroadcastresponse ENABLE

Rif: http://support.microsoft.com/kb/968872/en-us?fr=1

8 nov 2011

Hyper-V Server 2008 R2, Windows Server Core: How to change “NIC” name

First off all let’s see the the NIC's names.

netsh interface show interface

Now we can rename your Network Adapters/Local Area Connection/Interface

netsh interface set interface OldName NewName= “New Name”

Hyper-V Server 2008 R2: Core Configurator

Today, I found a useful tool on codeplex called Core Configurator.

It is completely open source so it can be amended and change to fit your requirements, this version has been a year in the making and has been written in powershell with a reference to Winforms so that a GUI format is displayed.
The primary focus of this project is to try and get feedback and contributions back from the community to make this a tool the best/ free tool everyone will want in there toolkit, so if you have some code or features that you might want included then please leave a comment and we will get in touch.
Core Configuration tasks include:

  • Product Licensing
  • Networking Features
  • DCPromo Tool
  • ISCSI Settings
  • Server Roles and Features
  • User and Group Permissions
  • Share Creation and Deletion
  • Dynamic Firewall settings
  • Display | Screensaver Settings
  • Add & Remove Drivers
  • Proxy settings
  • Windows Updates (Including WSUS)
  • Multipath I/O
  • Hyper-V including virtual machine thumbnails
  • JoinDomain and Computer rename
  • Add/remove programs
  • Services
  • WinRM
  • Complete logging of all commands executed

Pics.jpg

You can download it on Codeplex site: http://coreconfig.codeplex.com/

15 ott 2011

Exchange Management Console Troubleshooter

The EMTshooter runs on the local (target) Exchange server and attempts to identify potential problems with management tools connection to it.

The troubleshooter runs in 2 stages. First, it will look at the IIS Default Web Site, the PowerShell vdir, and other critical areas, to identify known causes of connection problems. If it identifies a problem with one of the pre-checks it will make a recommendation for resolving the problem. If the pre-checks pass, the troubleshooter will go ahead and try to connect to the server in the exact same way that the management tools would. If that connection attempt still results in a WinRM-style error, the troubleshooter will attempt to compare that error to a list of stored strings that we have taken from the related support cases that we have seen. If a match is found, the troubleshooter will display the known causes of that error in the CMD window.

For more informaiton on this download see: http://blogs.technet.com/b/exchange/archive/2010/12/07/3411644.aspx

13 ott 2011

Exchange 2010: IP Block List Providers and the variables

In Exchange 2003 we could set custom error message with below variables:


%0: IP address of the sending mail server
%1: Rule name of the connection filter
%2: The RBL provider

BUT in Exchange 2007 or Exchange 2010 the variables above are not longer available.

To set custom rejection response we can use below variables.


{0}: IP address of the sending mail server
{1}: Rule name of the connection filter
{2}: The RBL provider

I.e.: Message refused: your IP {0} is listed by {2} (see http://multirbl.valli.org/lookup/{0}.html for details).

image

Naturally we can use the EMS:

Add-IPBlockListProvider -Name:Spamhaus -LookupDomain:zen.spamhaus.org -AnyMatch $True –RejectionResponse “Message refused: your IP {0} is listed by {2} (see http://multirbl.valli.org/lookup/{0}.html for details).”

image

Ref: http://technet.microsoft.com/en-us/library/bb124369(EXCHG.140).aspx

6 set 2011

SBS 2011: Event 217 invalid header fields with Failure hrResult (0x800ccc63)

In case the SBS 2011/2008 POP3 connector returns the error 217 on Event Viewer under Microsoft-Windows-Small Business Server/Operational

One or more (x) e-mail messages in the POP3 mailbox account 'emailaddress@domain.com' on the POP3 server 'mail.domain.com' have invalid header fields. Because of this, the messages cannot be delivered to the Exchange Server mailbox 'mailbox@domain.com' in Windows Small Business Server. The messages are still on the POP3 server. To resolve this issue, connect to the POP3 mailbox account, and then manually retrieve or delete the messages.

“and then manually retrieve or delete the messages”  LOL!!!!

If you have a look in the pop3connector.log [ C:\Program Files\Windows Small Business Server\Logs\pop3connector ] :

[t 0] 09/06/11, 17:46:10: (POP3) [RX] 505 27477
[t 0] 09/06/11, 17:46:10: (POP3) [RX] 506 4446
[t 0] 09/06/11, 17:46:10: (POP3) [RX] 507 32528
[t 0] 09/06/11, 17:46:10: (POP3) [RX] 508 358136
[t 0] 09/06/11, 17:46:10: (POP3) [RX] .
[t 0] 09/06/11, 17:46:10: Downloading message 1 of 500.
[t 0] 09/06/11, 17:46:10: (POP3) [TX] RETR 1
[t 0] 09/06/11, 17:46:10: (POP3) [RX] +OK 8723 octets follow.
[t 0] 09/06/11, 17:46:10: Sending message 1 to the SMTP recipient allusers@XXX.COM...
[t 0] 09/06/11, 17:46:10: (SMTP) [TX] MAIL FROM: <SUBJECT EMAIL> RET=FULL
[t 0] 09/06/11, 17:46:10: Downloading message 2 of 500.
[t 0] 09/06/11, 17:46:10: (POP3) [TX] RETR 2
[t 0] 09/06/11, 17:46:10: (POP3) [RX] +OK 171731 octets follow.
[t 0] 09/06/11, 17:46:15: (SMTP) [RX] 501 5.1.7 Invalid address
[t 0] 09/06/11, 17:46:15: Failure hrResult (0x800ccc63) trying to deliver message id 1:
[t 0] 09/06/11, 17:46:15: SMTPRESPONSE:    * * *   !Failed!   * * *
[t 0] 09/06/11, 17:46:15:                  * * *              * * *
[t 0] 09/06/11, 17:46:15:                  * * *  0x800ccc63  * * *
[t 0] 09/06/11, 17:46:15:       Command: [SMTP_MAIL]
[t 0] 09/06/11, 17:46:15:     Completed: Yes.
[t 0] 09/06/11, 17:46:15:     IxpResult:
[t 0] 09/06/11, 17:46:15:   ---> ---> --->  hrResult: 0x800ccc63
[t 0] 09/06/11, 17:46:15:                pszResponse: 501 5.1.7 Invalid address
[t 0] 09/06/11, 17:46:15:              uiServerError: 501
[t 0] 09/06/11, 17:46:15:              dwSocketError: 0
[t 0] 09/06/11, 17:46:15:                pwszProblem: <none>

As you can see, the connector not validates the header, passing the ball with “Return-Path” error direcly to Exchange transport. The latter has the parameter MaxProtocolErrors setted to 5 ( LOL )

First of all you can try to set the “Default Domain” on the “Sharepoint Fax Receiver Connector”. To do this we can use this EMS command:

Set-ReceiveConnector -Identity ($Env:computername + "\Windows SBS Fax Sharepoint Receive " + $Env:computername) -DefaultDomain $Env:UserDNSDomain

If you are unlucky, try to increase the paramenter “MaxProtocolErrors”

Set-ReceiveConnector -Identity ($Env:computername + "\Windows SBS Fax Sharepoint Receive " + $Env:computername) -MaxProtocolErrors 500

Remember to restart POP3Connector and MSExchangeTransport

4 set 2011

Exchange 2010: HAProxy, a free Layer 4 Virtual Load Balancer

Haproxy runs on Unix like OS (Linux, FreeBsd) and can be used to resolve all load balancing problem, of course even those Exchange Server 2010.

HAProxy is a free, very fast and reliable solution offering

high availability, load balancing, and proxying for TCP and HTTP-based applications. It is particularly suited for web sites crawling under very high loads while needing persistence or Layer7 processing. Supporting tens of thousands of connections is clearly realistic with todays hardware. Its mode of operation makes its integration into existing architectures very easy and riskless, while still offering the possibility not to expose fragile web servers to the Net, such as below :


You can visit the Steve Goodman’s Blog, where you can read how HAProxy works with Exchange 2010.

http://www.stevieg.org/e2010haproxy/

http://haproxy.1wt.eu/


1 set 2011

How to use FTP via Windows Explorer

You can go to Start > Computer, or use the shortcut Windows Key + E to start it.

Once Windows Explorer is up Type ftp.domain.com into the address bar, that should connect you and cause it to prompt you for a password.

Just input the full username and password for the account you wish to connect to and hit Log On.

You now have an open FTP connection, you can drag and drop files to and from this windows and your computer to upload/download files.

24 ago 2011

Windows Log Files For TroubleShooting

I believe every System Administrator should know about the log files for troubleshooting Windows Server. These logs are great help for troubleshooting lot of Windows related problems from windows update to Group Policies. Windows Generates log for every process that has been done on the server. Listed below are some of the log files you should check in case of failures.

DCPromoUI.log

The DcpromoUI.log file contains a detailed progress report of the Active Directory installation and removal processes. Its default location is the % SystemRoot %\Debug folder on Windows 2000–based servers. Logging begins when the Active Directory Installation Wizard is opened and continues until the summary screen appears; regardless of whether it terminated prematurely or completed successfully. If the installation or removal failed, detailed error messages appear in the log immediately after the step that caused the failure. When the installation or removal process is successful, the log provides positive confirmation of that fact.

Netsetup.log

When joining a computer to a Windows 2000 domain, the Networking Setup (NetSetup) installs all the necessary Microsoft supported networking components. The Netsetup.log file provides information about the attempts to join domains and records any errors that might be preventing the join from being successful. Also, to install networking components not directly supported by Microsoft, the NetSetup tool provides a way to connect into the setup process for third-party components.

Userenv.log

The output of this log file can be helpful in troubleshooting problems with user profiles and Group Policy processing. The log file resides in the % SystemRoot %\Debug folder.

Netlogon.log

The Net Logon service responds to network logon requests. The Net Logon service dynamically creates records in the DNS database that are used to locate a server.

Ntfrsapi.log

The File Replication service (FRS) text-based log file is the Ntfrsapi.log file. It resides in the % SystemRoot %\Debug folder. It tracks replication problems and contains events that take place during the installation or removal of Active Directory, for example, creating the NTFRS registry keys

Thanks to Syed Khairuddin for the original post : http://www.virmansec.com/blogs/skhairuddin/archive/2011/06/29/windows-log-files-for-troubleshooting.aspx

5 ago 2011

Exchange 2010: Settare Out Of Office (Fuori Sede) per tutte le Mailbox

Dato che siamo in tema di ferie, ecco come settare il “fuori sede” o OOF per tutte le mailbox

Get-Mailbox | Set-MailboxAutoReplyConfiguration  -InternalMessage "Avvisiamo la gentile clientela che la DITTA rimmarrà chiusa per ferie dal x al x Agosto compresi." -ExternalMessage "Avvisiamo la gentile clientela che la DITTA rimmarrà chiusa per ferie dal x al x Agosto compresi." –AutoReplyState Scheduled –StartTime [data] –EndTime [data] 

Al rientro basterà utilizzare questo comando:


Get-Mailbox | Set-MailboxAutoReplyConfiguration -AutoReplyState Disabled

30 lug 2011

Linux Integration Services Version 3.1 for Hyper-V

Microsoft has released version 3.1 of the Linux Integration Services for Hyper-V.

The supported operating systems for 3.1 are:

  • “Red Hat Enterprise Linux (RHEL) 6.0 and 6.1 x86 and x64 (Up to 4 vCPU)
  • CentOS 6.0 x86 and x64 (Up to 4 vCPU)”

http://www.microsoft.com/download/en/details.aspx?id=26837

15 lug 2011

Exchange 2010 - Do you really want to know how much "white space" is in your mailbox database?

Do you really want to know how much "white space" is in your mailbox database?

Simply, use the following cmdlet in EMS:

Get-MailboxDatabase –Status | select AvailableNewMailboxSpace

13 lug 2011

Exchange 2010: Support for UPN credentials in OWA change password feature

Last year when we released Exchange 2010 SP1, we posted about the change expired password feature in Outlook Web App and how you can enable it by creating the ChangeExpiredPasswordEnabled registry entry. See So you want to change your expired passwords in OWA... for details.

Since then you've sent us many requests for supporting the use of User Principal Name (UPN) format in the same feature. Previously only domain\username format was supported when entering domain credentials.

We passed on that feedback to Exchange PMs and we're glad to let you know that the support for UPN credentials is now available in Exchange 2010 SP1 RU3-V3, which was released recently.

Note: At the time of this writing, Update Rollup 4 is the latest rollup available for Exchange 2010 SP1.

References:

source: msexchange official team blog

12 lug 2011

Favicons issue on IE 9 (only)

Favicons do not like to Internet Explorer 9,  vice versa all other browsers over the world.

To resolve this hateful problem (i.e. in your Google Blogger blog) you remember:

1. Your icon should be a valid dimension: 16x16, 32x32 or 48x48.

2.  Place the following code immediately after <head>:

<link href='http://www.yourhosting.com/your_icon.ico' rel='icon' type='image/x-icon'/>

3. Place the following code immediately before </head>

<link href='http://www.yourhosting.com/your_icon.ico' rel='icon' type='image/x-icon'/>

<link href='http://www.yourhosting.com/your_icon.ico' rel='shortcut icon' type='image/x-icon'/>

You can convert your PNG picture in ICO through this site: http://www.convertico.com/

4 lug 2011

Exchange 2010 SP1: How to delete the First (or last) database and move the system mailboxes

When you try to delete the Default Mailbox Database (created with 1st installation of the Mailbox Role), you receive the error below

“This mailbox database contains one or more mailboxes or arbitration mailboxes. Before you can remove this mailbox database, you must disable, move or remove user mailboxes and move arbitration mailboxes.”

Why?

The First database contains the SystemMailboxes which are the Arbitration mailbox(es).

We have to move these system mailboxes to another database before of remove the Default Database.

1. Find the Arbitration Mailbox with EMS

Get-Mailbox -Arbitration |  Where {$_.Name -like "SystemMailbox*" } | ft –wrap

2. Now have to create a new move request

New-MoveRequest -Identity "SystemMailbox{1f05a927-32d1-4e19-8ea5-67eba859f541-yourGUID}" -TargetDatabase "dbxxxx"   

3. Verify if the move request was done

Get-MoveRequest

4. Remove the request

Remove-MoveRequest -Identity "the name of the request like Microsoft Exchange Approval Assistant"

1 lug 2011

FreeNAS 8.0 Simplifies Storage

The FreeNAS distribution is tailor-made for installation in a small office environment. It is an extremely low-resource network storage system that you can administer through a Web browser, but it supports high-end features like automatic backups, replication, LDAP or Active Directory authentication, and seamless file-sharing over NFS, CIFS, AFP, and even FTP and TFTP. The latest release — version 8.0 — is just a few weeks old, and it is the perfect time to take a look.

more at the source: http://www.linux.com/learn/tutorials/464109-freenas-80-simplifies-storage

Have you tested it? What do you think?

ss-freenas-gui

After Installing Exchange 2010 Service Pack 1, Searching via OWA or Outlook Online Mode Fails

With Exchange 2010 Service Pack 1, you may find that performing a search via Outlook Web App (OWA) results in an error message, “The action couldn’t be completed. Try again later.” Additionally, Outlook clients operating in Online Mode can no longer search for attachments or embedded emails.

What causes this issue?

This problem typically is a result of installing or upgrading a multi-role server (a server that has the Mailbox, Client Access, and Hub Transport roles installed) to SP1 and then removing the Hub Transport and Client Access roles, thereby leaving the server with only the Mailbox role installed.

There is a symbolic link for each language referenced in the registry, HKEY_LOCAL_MACHINE\SYSTEM\CurrentControlSet\Control\ContentIndex\Language. The symbolic links (ActiveX CLSID of the class used) allow for word breaking and stemming for the locale corresponding to the language.

During the Exchange 2010 Service Pack 1 uninstall process for the Hub Transport role, setup removes the symbolic links, regardless of the fact that the Mailbox role is still present. The removal of the symbolic links causes the generation of content indexing files to fail.

29 giu 2011

Office 2010 SP1 RTM was released

Microsoft Office 2010 Service Pack 1 (SP1) provides the latest updates for Office 2010. This service pack includes two main categories of fixes:

  • Previously unreleased fixes that were made specifically for this service pack. In addition to general product fixes, these fixes include improvements in stability, performance, and in security.
  • All the public updates that were released through June 2011, and all the cumulative updates that were released through April 2011.

Read more at: http://support.microsoft.com/kb/2460049

Download the Microsoft Office 2010 Service Pack 1 64-bit package now. (En)
Download the Microsoft Office 2010 Service Pack 1 32-bit package now. (En)

Download | Office 2010 SP1 (32-Bit) Italian
Download | Office 2010 SP1 (64-Bit) Italian

27 giu 2011

Outlook 2010 Shared Mailbox: Sent or deleted Items placed directly in the Shared Mailbox

By default (or design? Smile), Outlook 2010 will place all sent items and deleted items in the user's mailbox. The issue with this is that users of a shared mailbox cannot view what emails have been sent or deleted. In Outlook 2007, you could manually enable this feature by adding a registry key. This doesn't work the same way in Outlook 2010. There is a fix though.

  1. Request the hotfix from Microsoft found at http://support.microsoft.com/kb/2459115
    You need will need to fill out the information to have Microsoft send you a link to the hotfixes. There is one for x64 and x86. (Probably it will included in SP1)
  2. Install the provided hotfix.
  3. On the client computer logged in as the user, add the following registry key (based on http://support.microsoft.com/kb/972148):

[HKEY_CURRENT_USER\Software\Microsoft\Office\14.0\Outlook\Preferences]

"DelegateSentItemsStyle" =dword:00000001

  1. And if we want mantain in the shared mailbox also the deleted items..

HKEY_CURRENT_USER\Software\Microsoft\Office\14.0\Outlook\Options\General 

“DelegateWastebasketStyle” =dword:00000004

  1. In the mail profile, add each shared mailbox as an account.

  2. Reboot the computer.

14 giu 2011

Spiceworks Mobile for Android platform was released

Manage "Everything IT" - Anywhere.
Take your IT network, tickets and users with you wherever you go! With Spiceworks Mobile, Spiceworks users have the info they need to do their IT jobs – at their fingertips. See devices, work tickets, access user info, read IT discussions, and more.

Used by over 1 million IT pros worldwide, Spiceworks free IT management app & online community simplifies “everything IT” about the IT workday. From network inventory, monitoring & mapping to help desk, vendor ratings & reviews and more, Spiceworks delivers everything an IT pro needs to get their daily grind done.

All for free.

https://market.android.com/details?id=com.spiceworks&pli=1

http://www.spiceworks.com/

image

20 mag 2011

The final Linux 2.6.39 kernel was released

The final Linux 2.6.39 kernel was released with a fairly modest feature set, led by a new IPset technology for simplifying firewall deployment. Other major features include Ext4 performance and scalability improvements, a media controller subsystem for video acquisition, a block plugging overhaul for fast storage I/O, and support for the latest AMD "Cayman" Radeon graphics.

Linus Torvalds (pictured) announced the 2.6.39 release with some doubts as to whether he should have issued another RC release instead. A scheduling conflict -- caused by the fact that the Linux creator and overseer is wanted for a keynote at LinuxCon Japan on June 1-3 -- forced him to push the new kernel out the door without merging more code. The deciding factor, he writes, is that this kernel release window has been "fairly 'easy'." ……

more: http://www.linuxfordevices.com/c/a/News/Linux-2639-released/

18 mag 2011

Exchange 2010 SP2 was announced.

The Exchange Team is pleased to announce that in the second half of calendar year 2011 we will be releasing Exchange Server 2010 Service Pack 2 (SP2) to our customers. With SP2, the following new features and capabilities will be included:

  • Outlook Web App (OWA) Mini: A browse-only version of OWA designed for low bandwidth and resolution devices. Based on the existing Exchange 2010 SP1 OWA infrastructure, this feature provides a simple text based interface to navigate the user’s mailbox and access to the global address list from a plurality of mobile devices.
  • Cross-Site Silent Redirection for Outlook Web App: With Service Pack 2, you will have the ability to enable silent redirection when CAS must redirect an OWA request to CAS infrastructure located in another Active Directory site. Silent redirection can also provide a single sign-on experience when Forms-Based Authentication is used.
  • Hybrid Configuration Wizard: Organizations can choose to deploy a hybrid scenario where some mailboxes are on-premises and some are in Exchange Online with Microsoft Office 365. Hybrid deployments may be needed for migrations taking place over weeks, months or indefinite timeframes. This wizard helps simplify the configuration of Exchange sharing features, like: calendar and free/busy sharing, secure mailflow, mailbox moves, as well as online archive.
  • Address Book Policies: Allows organizations to segment their address books into smaller scoped subsets of users providing a more refined user experience than the previous manual configuration approach. We also blogged about this new feature recently in GAL Segmentation, Exchange Server 2010 and Address Book Policies.
  • Customer Requested Fixes: All fixes contained within update rollups released prior to Service Pack 2 will also be contained within SP2. Details of our regular Exchange 2010 release rhythm can be found in Exchange 2010 Servicing.

More at the source: http://blogs.technet.com/b/exchange/archive/2011/05/17/announcing-exchange-2010-service-pack-2.aspx

13 mag 2011

Ventanni fa… quando internet non esisteva ancora.

Ventanni fa internet non c’era ancora, ma c’erano le radio. Il CB le HF, le VHF e i radioamatori.

Sulla 27 di rado si riuscivano a fare collegamenti straordinari come l’Australia o il Giappone.

Come si può immaginare quei collegamenti avevano una potenza debolissima e la lancetta del segnale sulla radio non si alzava nemmeno. Dovevi carpire ogni sussuro di chi stava dall’altro lato del mondo tra mille altre voci e mille disturbi.

Questa è storia! Altro che Email!

Saluti – IW2GUY - 20NF131

qslfront

qsl_rear

17 apr 2011

Essential Tools: Parted Magic

The Parted Magic OS employs core programs of GParted and Parted to handle partitioning tasks with ease, while featuring other useful software (e.g. Partimage, TestDisk, Truecrypt, Clonezilla, G4L, SuperGrubDisk, ddrescue, etc…) and an excellent set of info to benefit the user. An extensive collection of file system tools are also included, as Parted Magic supports the following: btrfs, ext2, ext3, ext4, fat16, fat32, hfs, hfs+, jfs, linux-swap, ntfs, reiserfs, reiser4, and xfs.

Features

  • Format internal and external hard drives.

  • Move, copy, create, delete, expand & shrink hard drive partitions.

  • Clone your hard drive, to create a full backup.

  • Test hard drives for impending failure.

  • Test memory for bad sectors.

  • Benchmark your computer for a performace rating.

  • Securely erase your entire hard drive, wiping it clean from all data.

  • Gives access to non-booting systems allowing you to rescue important data.

  • Runs from the CD, no install required.

Partition Editor

Download at http://partedmagic.com/doku.php

9 apr 2011

Windows Server Solutions Best Practices Analyzer 1.0

Windows Server Solutions Best Practices Analyzer 1.0 (Windows Server Solutions BPA) is a diagnostic tool that is built on the Microsoft Baseline Configuration Analyzer (MBCA) technology. Windows Server Solutions BPA scans a computer that is running the Windows server solutions software, and compares the existing server settings to a predefined set of recommended best practices.


Windows Server Solutions BPA performs the following tasks:

  • Gathers information about a server that is running Windows Small Business Server 2011 Standard, Windows Small Business Server 2011 Essentials, Windows Storage Server 2008 R2 Essentials, or Windows Multipoint Server 2011
  • Determines if the server settings comply with a set of best practices that are recommended by Microsoft
  • Provides a report of the scan results, which identifies variances from the recommended best practices
  • Identifies conditions that may lead to problems with the server
  • Recommends solutions to potential problems  

Download: http://www.microsoft.com/downloads/en/details.aspx?FamilyID=d40dcc5b-8f97-49e2-ae79-9c7a7a69dec4

8 apr 2011

The Remote Server Administration Tools have just been updated for Windows 7 SP1.

Now we can manage dynamic memory and RemoteFX from the our desktop computer.

Remote Server Administration Tools for Windows® 7 with SP1 enables IT administrators to manage roles and features that are installed on computers that are running Windows Server® 2008 R2, Windows Server® 2008, or Windows Server® 2003, from a remote computer that is running Windows 7 or Windows 7 with SP1.

Download: http://www.microsoft.com/downloads/en/details.aspx?FamilyID=7d2f6ad7-656b-4313-a005-4e344e43997d

7 apr 2011

Microsoft Launches Bing App for iPad

Today, Bing released the Bing for iPad app, a new way to interact with Bing. Since launching, Bing has been focused on helping people stop searching and start deciding – regardless of where they are. The Bing for iPad app goes beyond the traditional search experience, offering a new visually rich way to search the Web. The experience is designed specifically to capture the fluid and intuitive nature of touch on a large, high resolution screen – allowing you to quickly browse news, movies, weather, local business listing and much more. And, you can do it all with the swipe of a finger – no more back button.

6 apr 2011

5 apr 2011

Microsoft iSCSI Software Target 3.3 for Windows Server 2008 R2 available for public download

The Microsoft iSCSI Software Target has been available for production use as part of Windows Storage Server since early 2007. It has also been available for development and test use by MSDN and TechNet subscribers starting in May 2009. However, until now, there was no way to use the Microsoft iSCSI Software Target in production on a regular server running Windows Server 2008 R2. This new download offers exactly that.

Now available as a public download, the software is essentially the same software that ships with Windows Storage Server 2008 R2. Windows Storage Server 2008 R2 and the public download package will be refreshed (kept in sync) with any software fixes and updates. Those updates are described at http://technet.microsoft.com/en-us/library/gg232597.aspx.

This release was preceded by intense testing by the Microsoft iSCSI Target team, especially in scenarios where the iSCSI Target is used with Hyper-V and with Windows Server Failover Clusters. We do imagine these to be amongst the most commons deployment scenarios.

Testing included running the Microsoft iSCSI Software Target in a two-node Failover Cluster and configuring 92 individual Hyper-V VMs, each running a data intensive application and storing data on a single node of that iSCSI Target cluster. The exciting part of the test was to force an unplanned failure of the iSCSI Target node being used by all the VMs and verify that we had a successful failover to the other node with all 92 VMs continuing to run the application without any interruption.

To download the Microsoft iSCSI Software Target 3.3 for Windows Server 2008 R2, go to http://www.microsoft.com/downloads/en/details.aspx?FamilyID=45105d7f-8c6c-4666-a305-c8189062a0d0 and download a single file called “iSCSITargetDLC.EXE”.

Read more: http://blogs.technet.com/b/josebda/archive/2011/04/04/microsoft-iscsi-software-target-3-3-for-windows-server-2008-r2-available-for-public-download.aspx

4 apr 2011

How to connect SkyDrive as logical unit with Online ID provider

SkyDrive is an online storage system included in Windows Live, which gives you 25 GB of space that you can sync to your desktop. Here’s how to connect it to your Windows 7 computer as a mapped drive.

First of all, you need to go to http://skydrive.live.com and use your Windows Live account (the same you use to access Hotmail, Messenger, Windows Live Mail or MSN) to log in and create the folders you want to use by using the New menu. You can create private and shared folders and customize the access for every one of them.

link_ID04

If you haven´t installed the Windows Live ID provider, you will be taken to a website to download it.

Now, to get the address where to map your SkyDrive´s folders, you can open Excel, Word, PowerPoint or OneNote 2010 click on File and then on Save & Send.

Select Save to Web and then click on the folder you want to map.

Double click on the folder you want to map and copy the folder´s address.

Click on Map network drive.

And you can paste the folder´s address, select a drive letter and select Reconnect at logon

The folder will open in a new window.

And you will see and access your mapped drive in the Computer window.

More at Source: http://www.howtogeek.com/56096/how-to-use-skydrives-25-gb-as-a-mapped-drive-for-easy-access/

29 mar 2011

Microsoft Windows Home Server 2011 RTM

Today, the Home Server engineering team signed off the release version of WHS 2011. An exciting milestone which now starts the process to make it available for purchase.

Affordable and easy-to-use, Windows Home Server 2011 is the ideal solution to help families keep their important digital files and data automatically backed up, organized, and accessible from virtually anywhere.

To help with questions we hear during this time of the product release cycle, I have provided further guidance below. If you have a specific question, please feel free to post in comments, on our WHS forum.

Windows Home Server 2011 helps multi-PC families easily centralize, connect, and personalize their digital files. It provides a simple, familiar, and reliable way to store, stream, share and automatically protect what is most important. In this document, we’ll go over what’s new and improved.

28 mar 2011

How to change the RWW login screen with customized logo on SBS 2011

To change the RWW login screen with customized logo on SBS 2011 you have to edit the image file below:

C:\Program Files\Windows Small Business Server\Bin\webapp\RemoteAccess\Customization\Product\logo.png

You may also refer to the detailed steps here  (Thanks Susan)

22 mar 2011

Firefox 4 is officially released

Mozilla, a global, nonprofit organization dedicated to making the Web better, is proud to release Mozilla Firefox 4, the newest version of the popular, free and open source Web browser. Firefox puts users in control of their Web experience, providing a streamlined user interface, fun new features, a boost in speed and support for modern Web technologies.

Firefox 4 is available to download for Windows, Mac OS X and Linux in more than 80 languages. Firefox 4 will also be available on Android and Maemo devices soon.

15 mar 2011

Internet Explorer 9 is available for download

The final, consumer-ready Internet Explorer 9 is available for download starting at 9:00 PM PDT at www.BeautyOfTheWeb.com in 39 languages. With this set of browser releases, the best experience of the Web is on Windows. IE9 shows how your Web experience and browser are only as good as the operating system they run on:

Fast. With IE9, the Web delivers a new level of performance by unlocking the power of the PC hardware through Windows.

Clean. With IE9, consumers can keep sites at the center of their browsing experience, pinning them to the taskbar and interacting with them the same way they do applications.

Trusted. IE9 offers industry-leading protections (like SmartScreen) for the real-world threats (such as malicious sites and phishing scams) that consumers face every day on a sometimes-hostile Web.

Interoperable. With hardware-accelerated HTML5, developers can use the same markup across browsers to deliver a new class of Web experiences that feel more like apps than sites.

Download: http://windows.microsoft.com/it-IT/internet-explorer/products/ie/home


more at IE team blog - source: http://blogs.msdn.com/b/ie/

8 mar 2011

How to remove/cleanup Windows 7 / Server 2008 R2 Service pack 1 Files

  1. Start an elevated command or Powershell prompt (Run as Administrator)
  2. If you are servicing this machine, enter dism /online /cleanup-image /spsuperseded /hidesp to cleanup the online computer. If you want to cleanup an offline wim image, instead enter dism /image:wimfile.wim /Cleanup-Image / spsuperseded /hidesp. The /hidesp option will remove SP1 from the “Installed Updates” section of Programs and Features, to ensure that users do not try to uninstall the service pack.
  3. DISM will now remove backup files and superseded components from your machine. When finished, you should have the below output :

image

28 feb 2011

Decode: char($) – String Reverse – HexToString – DeBase64

100 51 100 51 49 53 50 53 52 52 53 51 53 53 49 53 97 52 56 55 53 52 52 53 50 52 50 52 57 55 53 53 51 53 54 53 48 51 51 53 52 52 54 52 53 52 51 53 55 54 100 52 99 54 52 53 50 52 99 54 53 52 52 53 50 52 50 53 54 53 51 53

1. [ DEC / CHAR ]

http://home2.paulschou.net/tools/xlate/

d3d3152544535515a487544524249755356503354464543576 d4c64524c6544524256535

2. REVERSER Reverse any Text
http://www.crypo.com/

5356524254456c42546c4d6753454644533056535579424254 45784a5155354452513d3d

3. HexToString  (HEX )

http://home2.paulschou.net/tools/xlate/  

SVRBTElBTlMgSEFDS0VSUyBBTExJQU5DRQ==

4. [ BASE64 ]

????  Smile

Enjoy

25 feb 2011

Exchange 2010/2007: How to Export, Mailbox quota and size into a text file

To Export, Mailbox quota and size into a text file, follow the instruction below:

1. Save this script as ps1 file type (i.e.: file.ps1)

Get-mailbox –server <YOUR EXCHANGE MAILBOX SERVER> -ResultSize unlimited |
ft DisplayName,IssueWarningQuota,ProhibitSendQuota,@{label="TotalItemSize(MB)";expression={(get-mailboxstatistics $_).TotalItemSize.Value.ToMB()}}
| Out-File PATH:\FILENAME.txt

2. Run the script in EMS

.\file.ps1

The output text file should be as below:

DisplayName                   IssueWarningQuota             ProhibitSendQuota                  TotalItemSize(MB)           
-----------                        -----------------                   -----------------                        -----------------           
Administrator                   unlimited                           unlimited                                25                      
Discovery Search Mailbox unlimited                           50 GB (53,687,091,200 bytes)  1625                      

21 feb 2011

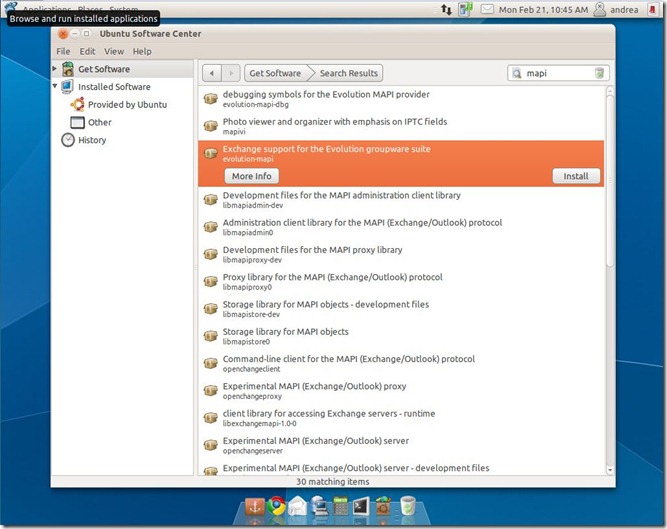
How to connect Linux Evolution to Exchange 2010 or SBS 2011

Want to have a client for Exchange 2010?  For Free ?  Yes ?

Linux and Gnome Evolution are the solution.

Follows the steps below:

1. Download a linux distribution like i.e. Ubuntu Desktop.

2. Install evolution-mapi support from Ubuntu Software Center.

mapi1

3. Start Evolution Mail and then click on Forward for two times. Insert your Full Name and Email Addressa and then click on Forward.

image

4. Click on Server Type and select Exchange Mapi. Type your Exchange Server hostname in the Server field, Logon access name in the Username field and then type your Domain name in the Domain name filed. Now click on Authenticate and type the AD password.

image

5. Evolution now works with Microsoft Exchange

image

enjoy Smile

14 feb 2011

Oracle Enterprise Linux has been released.

Oracle Enterprise Linux is an enterprise-class Linux distribution supported by Oracle. According to the project's web site, "Oracle starts with Red Hat Linux, removes Red Hat trademarks, and then adds Linux bug fixes." Oracle Enterprise Linux is, and intends to remain, fully compatible with Red Hat Enterprise Linux.
The Oracle Unbreakable Linux support program delivers enterprise-class support for Linux with premier backports, comprehensive management, indemnification, testing and more, all at significantly lower cost.
Both the Oracle Management Pack for Linux and Oracle Clusterware are free for Oracle Unbreakable Linux support customers. Oracle Validated Configurations provide best practices for easier, faster, and lower-cost Linux deployment.
With Oracle VM—a faster, lower cost server virtualization product—customers now have a single point of enterprise-class support for their entire virtualization environments.

Source: Disrtoatch

13 feb 2011

How to import .nk2 files into Outlook 2010

When you start Microsoft Outlook 2010 for the first time, your nickname cache (stored in the profilename.nk2 file) is imported into a hidden message in your default message store.
Note profilename is the name of your Outlook profile.

If you are using a Microsoft Exchange account, the nickname cache is imported into a hidden message in the Exchange mailbox.

So we have to import the nk2 file …

To import .nk2 files into Outlook 2010, follow these steps:

  1. Make sure that the .nk2 file is in the following folder:

    %appdata%\Microsoft\Outlook

    Note The .nk2 file must have the same name as your current Outlook 2010 profile. By default, the profile name is "Outlook." To check the profile name, follow these steps:

    1. Click Start, and then click Control Panel.
    2. Double-click Mail.
    3. In the Mail Setup dialog box, click Show Profiles.
  2. Click Start, and then click Run.
  3. In the Open box, type outlook.exe /importnk2, and then click OK. This should import the .nk2 file into the Outlook 2010 profile.
    Note After you import the .nk2 file, the contents of the file are merged into the existing nickname cache that is currently stored in your mailbox.

Note The .nk2 file is renamed with a .old file name extension on the first start of Outlook 2010. Therefore, if you try to re-import the .nk2 file, remove the .old file name extension.

Fix it is available direcly in the KB link: http://support.microsoft.com/kb/980542/en-us

9 feb 2011

Windows 7 and Windows Server 2008 R2 SP1 has been released

On February 16th Windows 7 and Windows Server 2008 R2 SP1 will be available for MSDN and TechNet Subscribers as well as Volume License customers. On February 22nd, Windows 7 and Windows Server 2008 R2 SP1 will become generally available for folks to download via the Microsoft Download Center and available on Windows Update.

For Windows 7, SP1 will help keep your PCs well supported by delivering ongoing updates, many of which have been made previously available through Windows Update. It also includes client-side support for RemoteFX and Dynamic Memory which are two new virtualization features enabled in Windows Server 2008 R2 SP1.

Two new features in Windows Server SP1, Dynamic Memory and RemoteFX, enable sophisticated desktop virtualization capabilities. These features build on the comprehensive virtualization functionality already included in the Windows Server operating system.

source:

http://blogs.technet.com/b/windowsserver/archive/2011/02/08/windows-server-2008-r2-and-windows-7-sp1-releases-to-manufacturing-today.aspx

http://blogs.technet.com/b/italy/archive/2011/02/09/windows-7-sp1-e-windows-server-2008-r2-sp1-annunciata-l-rtm-del-service-pack-1-e-le-disponibilit-224-per-i-download.aspx

8 feb 2011

Samsung Galaxy Mini GT-i5800: how to Fix the GPS problem

How to Fix the GPS problem:

1. Start the GPS
2. Digit *#*#1472365#*#*. Now appear a menu: GPS setting .
3. Settings -> Parameter Settings -> Address -> Server Type: 1x MPC
4. Settings -> Parameter Settings -> Position mode: option3
5. Settings -> Fix Request Settings -> Session Operation: Standalone
6. Settings -> Fix Request Settings -> Server Option: Local
7. gpsOne XTRA -> Xtra Enable: Enable

Don’t forget the Default settings!

1. Digit *#*#1472365#*#*. Now appear a menu: GPS setting .
2. Settings -> Parameter Settings -> Address -> Server Type: UMTS SLP
3. Settings -> Parameter Settings -> Position mode: option2
4. Settings -> Fix Request Settings -> Session Operation: MS-based
5. Settings -> Fix Request Settings -> Server Option: Default
6. gpsOne XTRA -> Xtra Enable: Disable

froyo: *#3214789650#